SyncFolder is deliberately kept simple and does not pretend to be a total solution
for all synchronization and backup tasks. It is primarily intended for home use.
Key factors:
Installation and update of the app is easy and secure by means of the Windows Store.
The app allows you to copy one or more source folders to a target storage device or synchronize folders
that are located on 2 storage devices in case of bi-directional synchronization.
You can copy in 4 ways:
By 1-way synchronization - This method, also called '1-way mirroring', ensures that the folders and files on the destination
storage medium are an exact copy of those on the source. See here for a detailed description.
By 2-way synchronization - This method, also called '2-way mirroring', synchronizes
files and folders from Location A to Location B and vice versa. See here for a detailed description.
By direct copying - This method also copies all new and changed files, but files that are no longer present at the source location
are not deleted on the target medium.
By cut and move - This method moves all new files and folders to the target location and then deletes all successfully copied files
and folders on the source. Like cut and paste works in Windows Explorer. See here for a detailed description.
Extremely important! - Since the app allows you to assign any folder on your system as source or target location (i.e. Documents, AppData, ..),
you should be extremely aware of the copy/delete mechanisms that apply for 1-way, 2-way and cut&paste tasks. Read the descriptions
carefully and try to understand what 'synchronisation' actually means. Be carefull when choosing the
correct target folder for a 1-way sync task and the A and B folder for a 2-way sync task. Selecting the wrong folder can result in lots of
important data being deleted from this folder.
To prevent unexpected deletions from having catastrophic consequences, the app offers two features:
When a task involving file deletion is first executed, the files will not be deleted and a warning will be displayed.
On subsequent runs, the files will be deleted, but if the “move to recycle bin” option is configured (which is the default setting),
the files will first be copied to a recycle bin folder.
Possible data storage devices are:
Internal SSD and hard drives of the computer
External USB storage devices: USB keys, USB hard drives
CompactFlash and SSD cards
A network storage station: a shared network drive, e.g. a NAS device
A cloud storage location internally mounted on a folder on your computer: OneDrive, DropBox, Google,..
A cloud storage location that is not mounted on your computer: currently only supported for OneDrive (Personal).
Also, only supported as target device for sync/copy tasks.
Note: Support for Google Drive is disabled in the app. Recent changes at Google now require an external certification company to verify
compliance of the app with the Google Drive service. Given the extremely high cost of this and our intention to keep on offering the app
for free, we are unfortunately forced to disable Google Drive as storage location option.
Devices connected to the computer that support the Media Transfer Protocol, e.g. iOS and Android smartphones and tablets.
Android mobile devices supporting Mobile Sync using the Android SyncFolder app with a built-in File Server accessible over Wi-Fi.
FTP and FTPS (FTP over SSL/TLS) servers supporting classic user account and password authentication.
SFTP (SSH File Transfer Protocol) servers supporting classic user account and password authentication or
private and public key authentication.
Backup/synchronization jobs can be executed in 6 ways:
Manually - You can at any time open the SyncFolder app, select a given task and tell the app
to start the synchronization/backup job.
Automatically at a configured time - Automatic execution can be configured: daily, weekly or monthly.
Automatically when a file changes - Supported for storage devices on which it is possible in Windows
to detect file changes. There are typically only connected devices and local network devices.
At logon - Automatic execution starts when the user logs on.
By plugging in a USB storage device - When you have one or more jobs that have a USB storage device as source or target
device, then you can configure the job to also execute when you insert the USB device.
Command Line - You can execute one or more tasks using the Command Line action «syncfolder.exe --exec taskId1, taskId2».
This can be used if you want to make a shortcut on the desktop to execute a number of tasks.
Copying happens incrementaly: only those folders and files are copied that are new or have changed since the last backup.
Modified files are copied fully and thus replace a previous version, i.e no history is kept.
With 1-way and 2-way synchronization tasks there is an option to keep the 10 most recent revisions of a set of updated files by specifying
those files in a list. The files can be specified through their extension name, file name, or file pathname. Wildcards are
allowed to indicate multiple files. See the section about 'Source Filters' for a detailed description of possible file definition patterns.
The app allows you to include or exclude hidden folders. See Source filters.
In addition, the app also offers support for Importing photos and videos from devices connected via USB and/or WiFi.
To upload via WiFi, you need to install the SyncFolder Photos app on your mobile device.
The app is available for iOS and Android.
SyncFolder versus other synchronisation/backup apps
Because the app is initially intended for home users, many features which other apps have are missing.
User-friendliness and the simple configuration are central and ensure
that everyone can make copies of his or her important files without problems.
If you want more options such as backup history, encryption of files, binary content validation of files,
etc., then commercial tools and apps are probably better suited.
Scheduled backups
You can configure each task to automatically run daily, weekly or monthly. SyncFolder will then check every 15 minutes
in the background whether a job is due. You don't have to open the app for this.
Windows will therefore wake up the app every 15 minutes starting between 15 and 30 minutes from the time when the app
was installed. Because of this the execution of a job will not happen at the exact configured time but 0..15 minutes after the time.
Periodic checking will only occur when your computer is active. This means that it will not happen when your
computer is in lock state (screen off) and/or in sleep state. However, as soon as the computer becomes active, either because
you start it up or because you go out of lock/sleep state, SyncFolder will (after 0..15 minutes) trigger execution of all
the tasks that should have been started during the inactive period.
Automatic retries with certain failures - Normally the app will execute a scheduled job only once when it is due. This
is also true when during the sync/backup process errors occurs such as: failure writing to a folder, copy errors such as
file is locked, disk is full, etc. The user should then correct such faults and either re-run the task manually or wait till
the next schedule comes up.
With certain type of faults however the app will keep on doing retries every 15 minutes. These faults are: source drive/path
not specified or available, destination drive/path not specified or available, backup operation interrupted, source
access not allowed, destination access not allowed.
Important note! - Scheduled backups run in the Windows background and can be disabled globally in Windows. So, please
make sure that SyncFolder is allowed to run in the background. If it doesn't run, check Background-Apps in Windows Settings / Privacy.
Set the first toggle switch to On and also the toggle switch for SyncFolder which you can find in the list of apps.
Unidirectional (1-way) synchronization
With this method files will be copied only from a primary location (source) to a secondary location (destination),
i.e. in one direction only. No files will ever be copied back to the primary location.
The purpose for this type of synchronization is to make the destination location an exact copy of the source location. That is why
changes (i.e. add, delete, and modification of files and folders) at the source will be propagated to the destination.
Because, after execution the destination must be a exact mirror image of the source, the app might have to delete files and folders
at the destination; i.e. files that are not present on the source location (initially or later when the user has deleted them).
Important: Files deleted on the target location are not moved to the Recycle Bin!
Users are not always familiar with the concept of 1-way mirroring and therefore, in order to offer some kind of guard
against unexpected deletions, files will not be deleted the first time a 1-way mirroring task executes. Instead
a notification will be generated that allows the user to either acknowledge all pending and subsequent deletions or
re-configure the task.
File deletion with 1-way sync - The following principles apply:
Files that are not excluded in the task but which don't exist at the source, must always be deleted at the destination
irrespective whether the task runs for the first time or not, or whether the task has been reset (manually or because you have
changed one or more task properties in the task editor). This is what 1-way sync/mirroring is supposed to do and
therefore can't be changed in the app. If this is not what you want then you must change the task into a 'Copy' task.
Note: To protect you from unexpected deletes the first time a task runs, the app will in that case not immediately delete those files
but instead give you the possibility to either explicitly acknowledge the deletion and go on, or will offer you the possibility to
change the task type to something else. When you accept the deletion the task will re-run and the files will effectively be
deleted.
Files that are excluded in the task but exist at the destination, will not be deleted at the destination by default.
You can force the app to also delete those by configuring this option in the source 'Filters' dialog.
Attention: you must be aware that excluded files can be specified in various ways:
By excluding them as files at the source's root location. This is done in the source 'Folders' dialog.
By explicitly excluding them using file name pattern matching, but also implicitly by defining the files that must be included
(which makes all other files excluded). This is done in the source 'Filters' dialog.
Folder deletion with 1-way sync - The following principles apply:
As for files, folders that are not excluded in the task but which don't exist at the source, will always be deleted at the destination
irrespective whether the task runs for the first time or not, or whether the task has been reset (manually or because you have
changed one or more task properties in the task editor). If this is not what you want then you must change the task into a 'Copy' task.
Folders that are excluded in the task but exist at the destination, will not be deleted at the destination by default.
You can however force the app to also delete those by configuring this option in the 'Advanced Task Settings' dialog.
Attention: excluded folders can be specified in various ways:
By excluding them as 1st level subfolders at the source's root location. This is done in the source 'Folders' dialog.
By excluding them as a result of a possibly configured folder filter in the task 'Filters' dialog.
Handling empty subfolders with 1-way sync - The default way to handle empty subfolders is to create those folders
at the destination when they don't exist there. You can opt to not create those folders in the 'Advanced Task Settings' dialog.
Note: If empty subfolders exist at the destination and you change the option to not create them then the next time the task runs they
will be deleted.
Bidirectional (2-way) synchronization
With bidirectional synchronization SyncFolder lets you specify 2 storage locations A and B with the purpose of making sure that
the content in both locations is synchronized after the task has executed. Changes (i.e. add, delete, and modification of files and
folders) in one locations will be propagated to the other location and vice versa.
Items deleted in one location are also deleted in the other location. Also here, deleted items are not moved to the Recycle Bin!
When the app detects that items are modified in both locations then, depending on what the user configures,
a conflict will be reported or synchronization occurs for the most recently modified or added item.
The first time the app executes a bidirectional sync task (and also each time after a task is being reset) it assumes that all files
and folders in location A and B are new and therefore copies them to the other location unless they already exist there and have
identical 'last modified' date and time and length. If a file exists at both locations but have a different 'last modified' date and
time then the newest one will overwrite the eldest.
When finished cache/database files are created that hold file and folder information from the 2 locations. These files are used in
subsequent execution steps to find out about updates, additions and deletes that happened in both locations.
You can clear the cache/database files, and consequently set the task in its initial state, by opening the Status page and click there
the Reset button.
The same type of reset is also automatically done each time you change the configuration of a task, i.e. change the assigned folders,
modify filters, etc.
The actions that are taken when a file has been modified in both locations can be configured in "Additional job settings"
(Job properties window):
Keep both files and report a conflict: With this option (the default) none of the files are copied but instead a
conflict report is generated and you have to resolve the conflict manually.
Rename the older file and copy the newest: With this option the eldest file is first renamed and
then overwritten by the newest file. The renamed file will have the original file name with 'SFConflict - YYYYMMDD-HHMMSS'
appended to the file name. The date and time will be set to the last modified date and time of the original file.
Note: the next time the task executes the renamed file will be copied over to the other location unless it has been removed.
Overwrite the older file: With this option the newest file will be copied to the other location.
The modified file in the other locations will be gone.
The actions taken when a file or a subdirectory has been modified in one location and deleted in the other location can be
configured in "Additional job settings" (Job properties window):
Keep the file/folder and report a conflict: With this option (the default) the file/folder that is modified is kept in the location
and a conflict report is generated that lists the affected files and folders.
Keep the file/folder and restore in the other location: When this option is set the file/folder that is modified is kept in the location
but also restored in the other location. Both locations will again be identical.
Manual conflict resolving - When the task is configured to generate a conflict report and the app detects one or more update and/or
delete conflicts you will have the option to manually resolve the conflict by opening the Status window and click the
Resolve conflict button there.
A page is then opened were you can select what kind of synchronization action must be done for each file/folder: copy to left, copy to right, or ignore.
When you run the task again and you have selected 'ignore' or not resolved any of the conflicts, the app will generate the
conflict report again.
Cut and Paste task
The Cut and Paste task works like cut&paste in File EXplorer: Files and folders from the source location or copied to the destination
location after which they are deleted at the source.
As for any type of task you can configure filters to exclude certain files and folders. When a file/folder is excluded SyncFolder will
never delete them at the source location.
File and folder access restrictions
When the app is executing access to files and folders occurs under the control of Windows using the
access privileges of the interactive user. This is the currently logged on user. This means that
all source files and folders and the destination location specified in a task must be accessible by
the user who installed the app.
Force execution when USB device is inserted
SyncFolder can ask you to start a sync/copy job when the USB device that is assigned as source or destination device
is inserted in the computer. You must enable this in the task settings page. There are 3 options:
Not applicable or do nothing - SyncFolder will not react when inserting a configured removable drive.
Execute task after confirmation - SyncFolder will show a notification in the Windows Notifications Center when it detects that
that a configured removable device has been inserted. It will offer a 'execute' button in the notification which you have to
press in order to execute the task.
Execute task automatically - SyncFolder will show a notification in the Windows Notifications Center when a removable device has been
inserted and will execute the task immediately.
Please note however: When you don't eject the USB device while your computer is still on but instead remove the device
after the computer is powered off, SyncFolder will ignore the first insertion of the device the next time the computer
is restarted. You will then first have to remove the device (eject) and re-insert it.
Sync or copy to/from a built-in drive, USB drive, SD card, or virtual disk
If you want to assign a internal drive, a USB drive, a SD card, or a virtual disk as source/A or target/B location you must select
"Internal, external (usb,..) or network drive" as location type.
Next, click the "Select station/folder" button and select the folder you want to assign in the Windows folder selection window
that pops up.
When done, and in case the location involves a 'source' location or "A or B" location (2-way sync), the app shows a dialog
window where you can indicate wether all subfolders in the selected location must be included or only a few ones which
you have to select.
Sync or copy to/from Network disks
SyncFolder allows you to assign a netwerk disk both as source/A and target/B storage medium. You can assign the disk/folder in the Windows
Select folder popup window in 3 ways:
By selecting a folder of a mapped network share. Depending on how the network connection has been configured, the mapped share
can be presented in Windows in 3 ways:
As a drive that has a drive letter assigned such as: Y:, Z:, .. Because after restarting the computer a possible drive letter
(Y:, Z: ..) configured for this type of storage medium is not always immediately reassigned by Windows, SyncFolder will try to
convert the drive letter to a so-called UNC network share name. It will do this by opening a Network Share dialog window,
resolving the network name and then showing it as a UNC path name or a WebDAV URL.
As a link to a WebDAV enabled website such as 'use01.thegood.cloud'.
As a folder on your harddrive created by special cloud services such as OneDrive, DropBox, Google Backup and Sync, etc. Typically
these services will automatically replicate the data in this folder to the cloud.
In the first 2 cases the app will open a Network Share dialog window where it offers the possibility to specifically test and configure the access
credentials (username and password) that have to be used to connect with the network share.
The username and password will be saved in the Windows Password Vault against the ID that has been assigned to the task.
By selecting the full network device name or folder of a local network disk through the Network section which you
find at the bottom left side in the Select folder popup window.
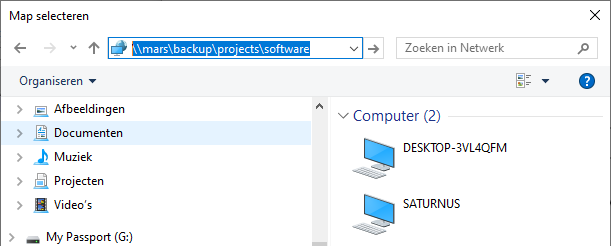
By providing the full path of the storage location (e.g. \\192.168.0.77\projects\..) manually. Do this by typing the
path in the top address textbox of the Select folder window.
Fig.1 - Typing the full path of a network device.
The address bar allows you to specify a locally accessible network share (using the special \\server\share URI syntax) or a share
that is available on a local or external website that supports the WebDAV protocol. Use the https://server/path URI syntax in that
case.
A couple of things to know:
If the network drive is not shown in the Network section and the drive is a shared drive on another Windows 10 computer
then it might be necessary that you have to start Function Discovery Resource Publication service on that computer.
Do this by starting the program 'services.msc' on that computer. How? Type Windows Key + R,
then type services.msc, and press Enter.
Then change the startup type of this service to 'Automatically delayed'. Finally, right click on the service and start
them up yourself.
If the network drive is a NAS device then you might have to enable WS-Discovery on your NAS. For security reasons some devices don't
enable this by default resulting in your NAS not being visible in Network in Windows File Explorer.
Consult the instructions that come with your NAS to enable it.
If you want to work with a network share that is not permanently mounted but one or more other shares on the same server are, then it is important to
understand how Windows deals with access to such a share.
If the share must be accessed with the same user credentials as all the others then you are good to go and there is no need to explicitly configure the
user credentials.
If the share requires different credentials then you must explicitly configure this as described next, but you will have to assign the 'server' part
in \\server\share either by means of its ip address or a unique server name. See the description of 'error 0' in the next paragraph.
Define user credentials explicitly - SyncFolder can fail to connect to a shared folder on a network drive in case Windows doesn't automatically
connect to the drive or for some reason has lost the connection when a task starts.
In order to work around this you can opt to specify the user credentials explicitly for the source and/or target network location. To do this you
must press the Network button that appears for each location that has a network share assigned.
The dialog that pops up allows you to enter the user crendentials and test if the connection with the entered credentials succeeds. Possible
errors that can come up are:
0 - The test is not allowed because the network drive is currently connected in Windows. You must first disconnect the drive, then do the test,
and finally reconnect the drive.
Note: If you disconnect the network share but you still have other shares connected to the same resource (i.e. the 'server' part in
\\server\share) then the test will still fail. In that case it is suggested to use either the server's ip address (like in \\192.168.2.3\J) if
the other shares are defined by a server name, or define a unique name for the server using a DNS alias or an entry in the Windows hosts file.
53 - The network path was not found.
86 - The user name or password is incorrect.
1219 - Windows doesn't allow access to a shared drive using a different name/password than the one that is currently assigned in Windows.
This error also occurs when you provide the wrong credentials for a disconnected drive.
1326 - The user name or password is incorrect.
Sync or copy to OneDrive
There are 2 ways to assign a OneDrive folder in a SyncFolder task:
If you have a OneDrive folder that has been mounted locally in the computer by means of the OneDrive
service that is integrated in Windows 10 and File Explorer, then you can assign such folder as source and
target location. So you can both sync or copy from or to such a OneDrive folder.
When selecting the folder as target folder make sure that in the location dropdown menu the option is set to
"Internal, external or network drive".
Starting with version 1.2.13 SyncFolder also allows you to assign a unmounted OneDrive folder as
target location. If you want to do that you must first set the option in the location dropdown menu to "OneDrive"
and then tap the "Select folder/drive" button. You will then be prompted to authenticate with OneDrive and enter your
account name and password. When successfully authenticated SyncFolder will save the account and
the tokens that come with the authentication in a local cache file and from there on use the access
token when performing the sync or backup action. SyncFolder will also automatically refresh the access token whenever
necessary.
This method of writing to a OneDrive folder is considerably slower than the 1st method. It requires extensive
interaction with the OneDrive cloud service because of the underlying use of HTTPS over the Internet.
Sync or copy to/from a WebDAV server (Nextcloud, ownCloud, ..)
You can assign a folder on a WebDAV server both as source and/or destination location in a SyncFolder task.
In case of a destination location make sure that in the location dropdown menu the option is set to
"Internal, external or network drive".
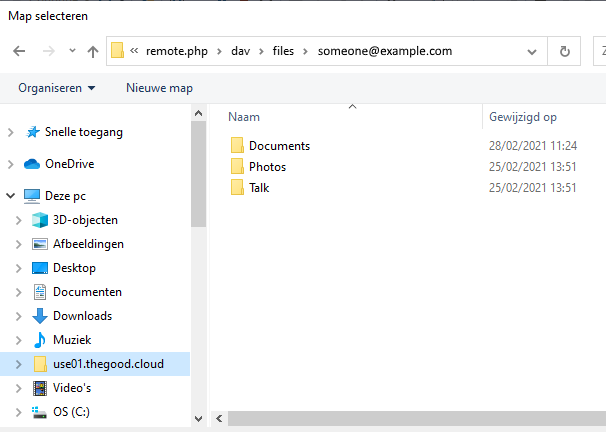
In the windows folder selection window you can assign the folder in 2 ways:
If you have a website share configured in Windows Explorer by means of a link or a mapped drive letter, then select the share
(in the left navigation panel), find the folder you want to use and select it.
Fig.1 - Select WebSite folder configured in Windows Explorer.
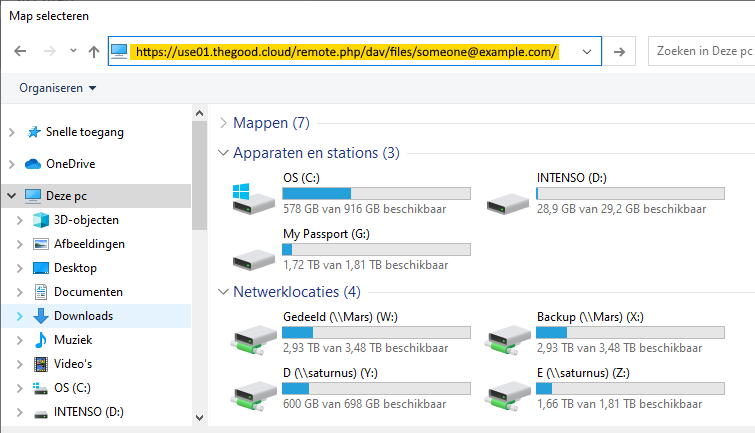
If the website share is still known by Windows (i.e. because you have/had a connection to the share in Windows Explorer), then you can try to specify
its address manually by entering the HTTP/HTTPS address in the top address bar of the Folder picker selection window.
Fig.1 - Select WebSite folder by entering the website address.
If the share is disconnected and Windows has still remembered the user account and password, Windows might prompt you to confirm the
user account and password before connecting to the WebDAV server. When all is correct the folder selection window will show all available folders.
Select then the folder you want to use.
After the folder is selected the app will open a Network Share dialog window. You will then have the possibility to specifically test and
configure the access credentials (username and password) for the website to cover situations where the credentials would not have been saved
or restored in Windows.
When all is well, close the Network Share dialog. Notice that the pathname of the selected folder includes the website
share address and the selected folder name with some extra SSL and DavWWWRoot info in it, like:
"https://use01.thegood.cloud/remote.php/dav/files/someone@example.com/" and "Documents" selected as folder, will become:
"\\use01.thegood.cloud@SSL\DavWWWRoot\remote.php\dav\files\someone@example.com\Documents".
Good to know: SyncFolder uses the built-in Windows 10 WebDAV Redirector of the WebClient service to retrieve folder information and
copy files and folders to and from the shared folder on the website. This service normally runs automatically as a result of a service
trigger in Windows. If you experience that the app can't connect to the website then check if the WebClient service might have stopped.
You can verify this by doing a right click on the Start menu and selecting Computer Management.
Expand Services and Applications and select Services.
Scroll down until you see the WebClient service and double click on it to open settings.
Sync or copy to/from a FTP/FTPS server
Starting with version 1.2.25 the app allows you to assign an external FTP server for both the source and destination location
of a task. FTP is supported for all type of tasks except bidirectional synchronization.
Depending on the capabilities of the FTP server, you can configure the app to either use 'normal' (i.e. insecure) FTP or
secure FTP over TLS. In the latter case SyncFolder will receive a server certificate while setting up a connection and prompt you to
trust it in case the certificate hasn't been trusted before within SyncFolder. After you have trusted the certificate the app will
save it in the 'trusted_certs.json' file (which is located in the app's local folder) and will then automatically accept the certificate
in subsequent server requests.
FTP over TLS v1.3 - Some FTP servers that support TLS v1.3 might be difficult to connect to because of the following reasons:
TLS v1.3 handshake error - This can occur immediately when setting up the connection and will then be reported with the error
"Could not authenticate". The cause of this is most likely some error in the server.
TLS v1.3 session resumption error - This error can occur when the app tries to retrieve the root folders from the server but
the server and/or the app fail to resume the TLS session. When this occurs SyncFolder reports an error
"Unable to build data connection: TLS session of data connection not resumed".
TLS session resumption should be supported natively in Windows (and in SyncFolder) but might give problems with some TLS v1.3 servers
(e.g. FileZilla Server). The cause of this is unclear at the moment but seems to point to an error in the TLS implementation
of Windows.
The only options you have when one of the above errors comes up is to configure the server settings in SyncFolder to force TLS v1.2.
If this doesn't work you should either use simple FTP (insecure) or SFTP (secure, using SSH File Transfer Protocol) when this is
supported by your server.
Things to know
When a new file is uploaded to a FTP server the 'Created' date and time is set in the server to the server's current date and time.
The 'Modified' date and time is set to the corresponding date and time of the source file. Note however that not all FTP servers
will accept this. Since there is no globally agreed standard on how to set the 'Modified' date and time, servers which accept it
will not always set it correctly: some set it in UTC format, some in local time format, some will misunderstand the format.
See also next point.
When an FTP client, such as SyncFolder, requests the 'Modified' date and time of files saved on the server, a lot of FTP
servers fail to correctly pass it: some don't pass the date and time at all, some pass them but not for all files, some pass
them in UTC format, some in the client's local time format, some in the local time format of the region where the server is located.
This makes it impossible for SyncFolder to check if a target file matches a source file based on the standard 2 file
attributes: 'Size' and 'Modified' date and time. SyncFolder will therefore not consider the date and time of any file when
one or both locations in a task is a FTP server. The app will only look at the file 'Size' to find out if a file has changed.
There is no possibility within the app to manage the trusted certificates after they are saved in the 'trusted_certs.json' file. If you
would like to remove certain certificates then you will have to use a text editor and edit the file manually. Take care then not to
brake the json format of the file.
Because the file is located in the app's local folder it will automatically be deleted when you uninstall SyncFolder.
Sync or copy to/from a SFTP server
Starting with version 1.2.25 SyncFolder allows you to configure an external SFTP server for both the source and destination location
of a task. SFTP is supported for all type of tasks except bidirectional synchronization.
SFTP is also completely different from FTP/FTPS as it makes use of the SFTP protocol to transfer files and folders using Secure Shell (SSH).
Communication with the server is inherently secure because of the following mechanisms:
Communication is fully encrypted.
Identification of the server is done by verifying the Host Key that is being sent by the server.
Authentication of the user (you) can be configured in SyncFolder in 3 ways: with a user name and password; with a user name and a
private and public key; with a user name, private and public key, and a private key passphrase.
Each time the app connects with the SFTP server it receives a Host Key, which it will check against all possible Host Key's that
previously have been saved by SyncFolder. The first time it connects the app will not find a valid key and will therefore prompt you
to trust the key. When you accept the key SyncFolder will save it in the 'trusted_hosts.json' file (which is located in the app's
local folder) and try to connect again.
Possible error messages appearing when connecting with a SFTP server:
Permission denied (publickey) - There can be a couple of reasons why you get this error:
There is no public key configured in the server for the user id / account name you provide.
You have selected the wrong private key (one that doesn't match with the public key on the server).
openssh key type: ssh-rsa is not supported - You have probably generated a private/public key with RSA as key type
and saved the key in OpenSSH format (the standard format when using 'ssh-keygen' in windows). The current version of SyncFolder
only supports 'ssh-ed25519' when the file is in OpenSSH format. You can do 2 things:
Convert the private key file to .pem format. Do this as follows on the Windows command line or in Powershell (assuming that
the name of the private key file is 'id_rsa'): ssh-keygen -p -f id_rsa -m pem
You will be prompted to add a passphrase if you want.
Use ed25519 as key type (provided the SFTP server supports this). Do this as follows: ssh-keygen -t ed25519 -b 4096
Don't forget to upload the new public key to the server. >
Note: Don't use a passphrase in this case since SyncFolder currently cannot deal with this! See also next point.
cipher name aes256-ctr for openssh key file is not supported - The private key file has a passphrase and is in OpenSSH format
with AES256-CTR as cipher. This typically occurs when you use 'ssh-keygen' in Windows to create a private/public key with the fast
ED25519 as public key algorithm and want to define a passphrase in order to also encrypt the private key file. The latest 'ssh-keygen'
program in Windows encrypts the private key file with the AES256-CTR cipher which unfortunately is not yet supported in the library
that SyncFolder uses for everything concerning SSH.
In case you do want to use a passphrase it is advised not to enforce 'ssh-keygen' to use the new ED25519 but instead use the default
RSA algorithm. But then still don't forget to add the -m option to save the private key file in PEM format. Do this as follows on the
Windows command line or in Powershell: ssh-keygen -b 4096 -m pem
The key files will be of the default type RSA and you will be prompted to add a passphrase.
Invalid private key file - The selected file is not a private key file.
Things to know:
When a new file is uploaded to a SFTP server the 'Created' date and time is set to the date time at that moment by the SFTP server.
With every upload (new or updates) the app tries to set the 'Modified' date and time the same as the one of the copied file. Some
SFTP servers might not allow this. In that case you must open 'Advanced task settings' and toggle the
"Do not copy files when the 'Modified' date is different .." switch to On. This will prevent that the app keeps on uploading
unmodified files each time the task executes. See also next section.
There is no possibility within the app to manage the Host Keys after they are saved in the 'trusted_hosts.json' file. If you
would like to remove certain host keys then you will have to use a text editor and edit the file manually. Take care then not to
brake the json format of the file.
Because the file is located in the app's local folder it will automatically be deleted when you uninstall SyncFolder.
SyncFolder supports the following private key formats:
RSA in OpenSSL PEM and ssh.com format.
DSA in OpenSSL PEM and ssh.com format.
ECDSA 256/384/521 in OpenSSL PEM format.
ED25519 in OpenSSH key format without a passphrase.
It does not support .ppk key files generated by PuTTYgen. You must convert them to one of the above supported formats.
Sync or copy to/from a MTP device
If you want to connect mobile devices (phones, tablets) to your computer using a USB cable then you will see that those devices
don't have a drive letter assigned but are mounted as a portable device. Technically speaking these devices use the
Media Transfer Protocol (MTP) to present their file system to the computer.
SyncFolder allows you to assign these devices both as source and target location for any type of task except a
bidirectional sync task. To assign a device select 'Phone, tablet or other mobile media device' in the dropdown box that is
available for both locations and then click 'Select drive/folder'. The app then shows all connected USB devices. After
selecting the device from the list the app shows the top level folder on the device, which you can then expand in order
to navigate to the intended (sub)folder.
Things to know
Device is in locked state - MTP devices not always behave correctly when the device is in locked state. It is
advised to always unlock the device before executing a task or changing something in the folders assignment.
Some MTP devices don't correctly set the 'Modified on' date and time when a file is copied to the device. If you
then don't configure the task to ignore any change of the 'Modified on' attribute and only look at the size property,
the task will re-copy every file and folder each time it runs. Configure this in the 'Additional task settings' popup dialog.
Source/Destination folder not available error - You can get this error when executing a task and the device is in lock state.
You must be aware that MTP is not as flexible as other USB devices that present their file system as a real storage device. It is
also not as fast as you would expect with modern USB interfaces. If the drawbacks (like those mentioned above)
would cause problems then you might have to consider using alternative mechanisms like:
The SyncFolder Photos companion app for mobile devices - This app lets you copy pictures and movies from your phone/tablet over
WiFi to a folder of a computer that has SyncFolder installed and running.
The use of a FTP, FTPS or SFTP (SSH) server app on your mobile device - Such app allows you to run a file server on the device and make
a number of folders on the device accessible for SyncFolder on your computer over WiFi. In SyncFolder's task configuration you then have
to select FTP, FTPS, or SFTP as location device type.
Note that file server apps never allow access to all folders on your mobile device. Typically, Android apps offer a bit more flexibility
than iOS apps.
SyncFolder works successfully with the following apps: SimpleSSHD - Dropbear (Android), SSH Server - Banana Studio (Android),
FTP Server - Banana Studio (Android), and FE File Explorer (iOS). The latter doesn't allow access to the pictures folder(s)
unless you first copy the picture files to a personal folder that is served by the app.
Sync or copy to/from a Android device supporting Mobile Sync
The Mobile Sync feature allows you to synchronize files between the Windows app and an Android device running the SyncFolder app.
Since the connection uses Wi-Fi, there’s no need for a USB cable, which can often be unreliable.
A detailed description on how to use this feature can be found here.
Advanced task settings
At the bottom of the task configuration page you can click Additional job settings to open a dialog window where you
can switch on a number of special settings.
Always scan target location - Switch this option on when the content on the target folder of the
task occasionally is updated outside of SyncFolder, e.g. by other processes running on your computer, or
by you manually adding and/or deleting files and folders.
When the option is off (the default) SyncFolder keeps an updated internal list of files and folders stored at the target
and, because of this file, doesn't scan the target location when the task runs. This has the effect that the task
runs faster but of course doesn't work correctly when the location is updated outside of SyncFolder.
Do not copy empty source folders to the target location - Switch this option on when you don't want
the app to create folders on the target that don't have any content on the source.
Switch off computer after task execution - Use this option if you want the app to request Windows to
shutdown after a task has successfully finished execution. You will then get an alert notification indicating that
shutdown will take place within 1 minute unless you react. You can react by clicking on the notification message
in which case the shutdown will be triggered immediately, or you can react by clicking the Cancel button in which
case shutdown will not take place.
Actions with removable devices - This section is only available when the task has 1 or more USB devices assigned.
You can configure the following:
Define what the app must do when a configured device is not available but a possible alternative device is.
You can indicate that the app shouldn't look for an alternative, use an alternative when it has the same label as
the missing one, or use an alternative when it has the same drive letter.
This option helps you when you are using a set of USB devices and are rotating them every couple of days, weeks..
By default the app gives a notification when a task runs and a configured USB device is not available. You can
opt to not send this notification.
Advanced synchronisation actions - This section is only available when the task is a 1-way or 2-way sync Task.
You can configure a number of special options.
Don't copy files when only the 'Modified on' date and time has changed - This option is available
for all type of source or target location except for a FTP/FTPS server.
It can be used in tasks to cover situations where you copy to external
storage which doesn't take over the modified date of the source after the copy took place. This can happen on
some cloud storage services (notably Amazon) which set the modified date and time to the date the file was copied.
The option to ignore the date is then there to prevent that SyncFolder keeps on copying files that haven't changed.
Remember, with a 1-way sync job the target must always be an exact copy of the source and with a 2-way sync job
both locations A and B must be exactly the same.
One must also be aware however that when setting this option, files of which the size hasn't changed will never
be copied. That might not be correct in the, although rare case of a file that allways has a fixed length but do
get changed.
Ignore 'Modified on' date and time changes for folders - This option is available
for all type of source or target location except for a FTP/FTPS server. It can be used when the
target storage device is not correctly taking over the 'Modified on' date and time of a source folder. In such
case SyncFolder will keep on generating 'sync folders' messages in the task status/action panel. Switch the option
to On to stop the app from trying to sync a folder's date and time.
Delete unselected files at the destination location - This options is only available for a 1-way sync
task. The default action with unselected files is to keep them on the target device in case they would exist there.
Switch the option to On if you are sure that you want to delete those files on the target device.
Delete unselected folders at the destination location - This options is only available for a 1-way sync
task. The default action with unselected folders is to keep those folders on the target device in case they would
exist there. Switch the option to On if you are sure that you want to delete those folders on the target device.
Selective file history - The normal way how SyncFolder works is to simply overwrite and/or delete (in case
of a 1-way sync task) files on the target that have been updated/deleted on the source. The idea behind the app is
that it has to be simple for any user and so it doesn't compete with apps that offer full history support.
However, in some cases users would of course like to be able to keep a history for a couple of files. The textbox
here allows you to specify those files (without the folder part) either by their full name, by a partially specified name
(using * wildcard characters), or by their extension type. The app will then copy any modified file which matches the
configured list to the target but before doing that will rename the previously copied file to something like:
"myfile.sql.20201013-110453.sfhist". It will keep up to 10 history files for each of those files. When 10 is reached
the eldest will be deleted. The copied file and the history files are located in the same directory on the target.
Import photos and videos from memory cards and devices connected through USB
The app allows photo and video files from external device (smartphones, cameras, memory cards) to be imported
to your computer. The supported USB connection types are: MSC (Mass Storage device Class) and MTP (Media Transfer
Protocol).
You can start the import job in 2 ways:
Manually - Click on the Import button on the start page or on the
Execute now button of the task in the tasks list.
Make sure the memory card is plugged in or your camera, smartphone or tablet is connected using a USB cable.
Then, select the card or the device.
Via the Autoplay/wizard option in Windows - Connect the device using a USB cable and
select "Import photos and videos (SyncFolder)" in the pop-up window.
In both cases, the first time you do this the app will prompt you to let it create a default Import job for photos and videos.
This job will be added to your registered tasks list and cannot be removed. It holds the default storage location for
saving photos and videos. It is set to the Pictures folder but you can change that at any time.
The app then scans the memory card or the device and shows all the photos and videos that it finds.
If you already have uploaded files previously, then only the new files are shown by default. To view all files,
click the "All" button.
Select the items you want to import and choose "Copy selected" or "Copy selected to".
With the first option, the selected files are placed in the folder that is configured for the task which, as explained
before, is per default the Pictures folder. With the second option, you can copy the files to a specific subfolder within the configured folder.
As an option you can also delete the selected photos and videos on the source device after they have been copied to the computer.
Importing photos and videos from mobile devices via WiFi
To use this feature you must install the SyncFolder Photos app.
You can find the iOS version on the AppStore
and the Android version on the Playstore.
On your computer:
Make sure that the WiFi network settings on your computer are configured to allow other devices/computers in your network to access
your computer. This is standard the case when the network profile is set to 'Private'.
See Settings > Network & Internet > Status > Modify connection properties > Network profile.
Check your network connection status
Start the SyncFolder app.
Wait for a connection request from your mobile device.
In case you don't have yet a Import job for photos and videos the app will prompt you to create one for you.
Accept the device.
On your mobile device:
Start the SyncFolder Photos app.
Choose the desired group/folder. Then select the items you want to export to your Computer.
A single tap selects the underlying item; a double tap selects all items between the new item and a
possibly higher selected item.
Click the Export button in the upper right corner of the screen.
Wait until your computer is displayed on the screen and select it.
Possible reasons why your computer would not appear:
You didn't start the SyncFolder app.
You didn't select your mobile device on the computer.
Your computer and mobile device are not connected to the same WiFi network.
Your WiFi network doesn't support automatic discovery of computers via multicast and/or broadcast.
In the latter case, you can still connect to the computer via WiFi by scanning the QR code on the Settings page of
the SyncFolder app.
If after scanning the QR code your mobile device is still not appearing on your computer then this is most
likely because computer-to-computer communication is not enabled for your network (see 1st bullet under
'On your computer' and network profile) or disabled on the WiFi router. The latter is frequently the case
in public WiFi hotspots. On those hotspots you will not be able to copy using WiFi.
After selecting the computer you will see all the subfolders that are available on the computer's target folder
(the one that has been configured for the Import job for photos and videos task).
Then, choose the subfolder where you want to copy the files to. If you want, you can even first create a new
subfolder on your computer from within the mobile device's app.
Then, wait until all selected files have been copied.
Importing and exporting the app repository to a new computer
You can easily copy the SyncFolder task repository to a new computer. To do that open the Settings page on the
old computer and click the Export button. You will then be prompted to save the repository file (apprepository.json)
to a location that you can access on the new computer.
Install SyncFolder on the new computer, start it and open the Settings page. Click then the Import button and
select the previously saved repository file.
If the new computer has access to the same source and destination folders as on the old computer then you should be good to go.
Note: The apprepository.json file contains all task settings except possible user account and password credentials that have been
configured for network drives, OneDrive, FTP and SFTP servers. You will have to reenter these credentials on the new
installation. The app saves these credentials in the Windows "Credential Manager" locker. SyncFolder tasks credentials are
listed under Web Credentials and have the task ID as name with at trailing "-S" or "-D" indicating whether the credential
applies to the source or destination location of the task.
Execute/Reset a task from the command line
Execute a task - To execute one or more tasks from the Windows Command Line or from a script SyncFolder offers the following command: "syncfolder.exe --exec taskID[[,] taskID,...] [--reset] [--minimize]".
Parameter taskID defines the ID of the task you want to execute. You can find this ID by opening the task "Configuration" or "Status" view.
You can provide multiple IDs by seperating them by means of an optional comma character and at least 1 space character.
Both views show the ID near the top of the view. You can copy the ID from there to the clipboard either by selecting the ID using the mouse or
pressing the small button that is being displayed next to the ID.
When the command is executed Windows will open the syncfolder app and a specific "Command Line" view is presented which
provides feedback about the execution progress.
An optional --reset parameter instructs the app to execute a task reset for all listed tasks before execution starts.
A reset clears all cache files of the task(s). It has as effect that the next task execution assumes that the task hasn't been executed yet.
Reset a task - To simply reset one or more tasks (and not execute them) SyncFolder supports the following command: "syncfolder.exe --reset taskID[[,] taskID,...] [--minimize]".
Parameter taskID defines the ID of the task you want to reset. You can find this ID by opening the task "Configuration" or "Status" view.
The command instructs the app to clear all cache files of the task(s). It has as effect that the next task execution assumes that the task
hasn't been executed yet.
If you want to automatically minimize the app after it has been opened, then you can add the --minimize option to the
command. Doing so will also stop (close) the app when it has finished execution of the command.
Note: Unlike normal Windows commands the "syncfolder.exe" command will always terminate with 'exit' code 0. This is because the
command itself doesn't execute the tasks but invokes the 'normal' app to do that.
Status and progress monitoring
You can monitor the status and progress of a backup job in SyncFolder in a number of screens.
Start screen - Each time SyncFolder is busy executing a job a message is shown to indicate this.
The message disappears when the job has finished.
When a job has failed an error message will appear which remains on the screen until the error has been corrected.
Tasks list screen - For each of the registered tasks you can see the result of the last executed backup.
Task status screen - This screen shows more details about the status and outcome of the last backup.
You can open this screen by selecting the task and then press the "Show status" button.
The 'Faults' section lists all the errors that came up when executing the backup.
The app keeps on copying files that are not modified
It is important to understand how SyncFolder finds out whether a file must be copied.
First it checks whether the sizes of the source and target file are different.
If they are then the source file will be copied to the target.
If the file sizes are the same and source or target location are not a FTP/FTPS server, then SynFolder will
compare the 'Modified on' date and time of both the source and the target file. If they are different then the source file will be copied.
If both the size and the 'Modified on' date (if no FTP/FTPS server involved) are the same then the app will check whether there is a
difference with respect to the capitalization of the 2 file names. If there is a difference then the
target file will be renamed.
If none of the above checks show a difference then the file is considered to be 'unmodified' and therefore
not copied.
In the above description it is important to understand how the above checks for the target file properties
(size, modified date and time, name capitalization) are actually done:
The first time a task runs the app looks up the 'real' target attributes as they are presented by the
file system on the target device.
This is also the case after you have clicked the Reset button in the task Status page or when the task
location, sync mode, filters, and/or advanced settings have been re-configured.
After the 1st run, as a default behavior, the app will not access the target attributes anymore on the phyical device
but instead take the attributes from a cache/database file. Because they were saved in the previous
run (and set to the values of the source files) the target check will run very fast.
You can change the default usage of the cache file and force the app to use the actual properties of the
target file system by clicking 'Additional task settings' in the task Configuration window and switch the 1st
toggle switch in the General section to On.
If SyncFolder is copying unmodified files over and over again with each run then you should investigate the following:
Look for possible errors in the Faults tab of the task Status window.
If a file can't be copied then the app will retry the next time it runs the task.
Check if the task is using the above described cache file. If it is not (i.e. the task runs after a Reset, or
a re-configuration, or you have disabled the use of a cache), then you have to check whether the target device is
correctly storing and/or presenting the 'Modified on' date and time of its files. This is a known issue with some
type of storage systems, like: some USB connected mobile devices (smartphones, tablets, ..), some FTP servers
not supporting the latest FTP commands, etc.
Tell SyncFolder in that case to ignore any change of the 'Modified on' attribute and only look at the
size property. You can do that in the 'Additional task settings' popup dialog.
SyncFolder and the firewall
There are 2 services in SyncFolder which, when enabled, require some help from the firewall to get them working:
The app uses MS AppCenter to send usage information and (more important) possible crash information to a Microsoft server.
It helps the developer to see what is still causing errors in the app.
MS AppCenter uses SSL/TLS and expects port 443 to be open for outgoing connections. On most systems port 443 is open
for outgoing traffic but some virusscanner might block this.
If you don't want that you can switch it off in Settings / Diagnostics. It might be interesting to try this when you
have a virus scanner reporting an error and see if it keeps on complaining.
When you enable the app to allow you mobile phone to connect with it over WiFi the app needs a rule in the firewall to accept
incoming connections from your phone. The app uses an ephemeral incoming port (in the range 49152–65535) to connect
with it. The port number is passed back to the mobile device when finishing the multicast/broadcast discovery process.
Also here, you have to enable this in Settings / Compagnion app.
If both services are disabled and you don't have any task that uses a network storage location like FTP, SFTP, WebDAV, OneDrive, etc.,
then the app doesn't do anything on the internet.
Error messages in SyncFolder
Common errors
Job can't be launched
The most common reason for this error is that you have disabled background execution of apps in Windows Settings. To enable
it open the Windows Settings app. Then, on Windows 10, go to Privacy / Background-Apps and enable SyncFolder there.
On Windows 11: select Apps / Installed Apps and enable background working in SyncFolder / Advanced Options.
Another possible reason is that an update of Windows has been recently installed on your computer but your computer
needs a restart. There is often a "win32 process can't be launched" error in that situation.
On some computers the error can also occurs because of a faulty Windows Store installation and/or issues with
the way the user account is configured in Windows. Reinstall the app then.
Target station is not available
Make sure that the configured storage device (e.g. USB flashdrive, SSD, ...) is plugged in.
Error 0x80070002: The system cannot find the file specified.
The file has probably been deleted.
Error 0x80070005: You are not authorized to access the file/folder
The most common cause for this error is that SyncFolder is not allowed to access the complete file system in Windows.
You can configure that in Windows Settings \ Privacy \ File system.
Other reasons for this error is that you as a user are not allowed to access/modify certain files and folders in the
system. Open Explorer to change such restrictions.
Error 0x80070079: The semaphore timeout period has expired
This error can occur when very large files need to be copied to a network drive or a USB device. Possible causes:
bad connection with your storage device, errors on your device, outdated USB driver, etc.
This error may prevent SyncFolder from copying any other files.
Action: Check your storage device carefully! If the error persists then the possible conclusion is that your
storage device is probably severely damaged. The only option left is to reformat the device (ideally in NTFS format).
Error 0x8007007b: Invalid syntax in name, ..
This error can occur when the app must copy a file from a device that allows characters like '\', '/', ':', '*', '?', '"', '<', '>', and '|'
in the name of a file (typically on Linux-based devices). This is not allowed in Windows when copying to a local
and/or network drive. To get rid of the error you must rename those files on the source device.
Error 0x80004003: Object reference not set to an instance of an object
It is currently unclear what causes this error. In most cases the error disappears after you remove and re-insert the
USB device. If that doesn't work you might have to restart the computer.
System.IndexOutOfRangeException: Index was outside the bounds of the array at CollectFilesAndFoldersFromDestinationFolder
This error can occur when you change the region in Windows and an already existing task is executed. To get rid of the
error you must reset the task by opening the Task Status window and clicking the Reset button.
Error: The following files are not allowed in Windows and will continue to be reported until a correction is made
This error comes up when SyncFolder finds files on a drive/server that have 1 or more characters in their name that are not allowed
in Windows and/or when it encounters duplicate file names in the same directory.
Invalid characters in file names can occur typically with Linux storage devices because Linux allows characters such as CR and LF
but also other unusual characters to be used in file names. Often the invalid files have a trailing CR character in their name which
came there because of a malformed script that has been used when copying between Linux systems.
Duplicate file names in the same directory is something that in principle cannot occur on any type of storage device, but occasionally
comes up when connecting to a Linux NAS. On the NAS the duplicate files not really have the same name (they have some additional
character in their name) but are reported to Windows as having identical names.
The app lists files with invalid characters in their name with the prefix 'S' in the Faults tab (on the Task Status page) but replaces
all invalid characters in their name by a '?' character.
Duplicate files are listed with the prefix 'D' in the list.
Solution: The only solution is to change the filenames on the storage device (e.g. remove the CR characters, or other characters) and/or
remove the duplicates.
Both actions are ideally done on the storage device itself; i.e. with a Linux NAS you can Telnet or SSH into the device.
To remove duplicate files some people have reported to do that on Windows by using external party 'duplicate finder' tools
(like 'TreeSize' and others). File Explorer can't delete them because it is not able to show the duplicates.
Application aware anti-virus services
Some anti-virus offerings per default don't allow unknown programs to execute and/or write and delete files and folders
on a drive. This can be a problem when SyncFolder is executing a sync/copy task in the background. Consult your anti-virus
user guide in order to allow SyncFolder to access the configured target folders or exclude those folders in the protection
service. If you are asked to configure the name of the executed process then find the name in the "C:\Program Files\WindowsApps"
folder. For SyncFolder the name of the process also carries its version number. For version 1.2.8 this is:
"C:\Program Files\WindowsApps\38124JosHuybrighs.SyncFolder_1.2.8.0_x64__t2c8vhzy5m6xy\SyncFolder.Win32Task\SyncFolder.Win32Task.exe".
You probably have to reconfigure this when SyncFolder is updated.
The app doesn't work as expected
If you encounter situations where the app doesn't execute backups, or backups are prematurely stopped or interrupted
then you can configure the app to generate event logs during execution.
To enable logging go to Settings and toggle the Log files switch.
Events are then saved in 2 log files: SyncFolderUWP.log and SyncFolderWin32.log. The location of those files
can be found by again going to Settings and clicking the "Show files in Explorer" button there.
If during logging a file gets too big than the app will copy its content to a history file and start with a new file.
Up to 3 history files are kept. A history file with suffix 1 is more recent than one with suffix 2 and 3.
You can forward these files to SyncFolder support by sending a message on the Contact page of the website.
Please, also include one of the history files when the standard log files look very small.
Uninstall the app
As with any app distributed on the Windows Store the easiest way to uninstall the app is to open the Windows Start Menu,
find the SyncFolder app in the list of apps, do a right mouse click on the app name, and select "Uninstall".
The next planned version, open issues and what's new in previous versions
Go to Version history in order to find a detailed description of the functionality that has been added over
time in the various versions of the app.
You can also find there the issues and errors that are known to exist in the latest version and new enhancements that are planned to be
released in the next version.