Working with automatically executed tasks
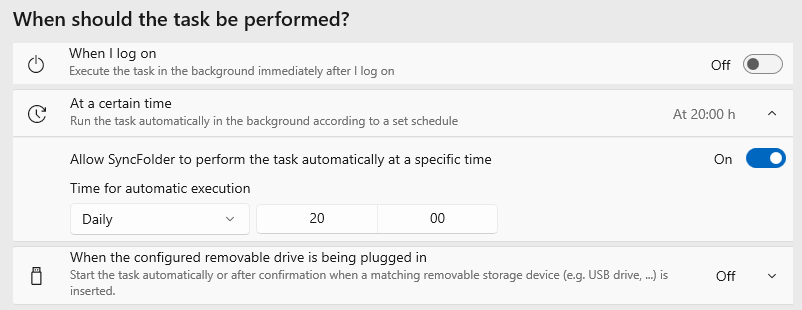
SyncFolder allows tasks to be automatically executed in the background in 3 ways (without you having to open the app):
- After log on to the computer
- Scheduled
- When inserting a USB storage device
Important - All of the above methods require that you have enabled SyncFolder to run in the background. This is something that can be disabled globally in Windows 10 or on a per-app basis in Windows 10 and 11. If background execution is disabled then open Windows Settings, go to Apps, find SyncFolder in the list and configure the app to allow it.
To configure a task for automatic execution you must open the Configuration page of the task and enable the option(s) that you want.

1. Execute when logging on to Windows
Set the toggle switch for this option to On if you want SyncFolder to start the task shortly after you have logged on to Windows. Execution then happens both after a fresh start and when Windows gets activated when going out of sleep state.
2. Execute on a schedule
This options allows you to set a date and/or time you want the task to execute. Possible schedules are:
- Every 15 minutes
- Every 30 minutes
- Every 1 hour
- Every 2 hour
- Every day at a specified time
- Every week at a specified day of the week and time
- Every month at a specified day and time
The periodic checking whether tasks have to be started happens with a 15 minute interval that is controlled by Windows.
This interval starts immediately after the computer is running from a cold startup or from becoming active after it went in sleep state.
Because this is a background task for Windows, the 15 minute interval is not always 15 minutes. There can be a variation
of + and - 10 minutes depending on other active processes and services.
Due to how background tasks are managed in Windows the schedular task of the app is put on hold when the computer is in
"sleep" state. Tasks that are configured to execute while in sleep mode will be delayed till the computer becomes active again
(or is restarted in case it would have been switched off).
Now, the trigger for reactivating the schedular might not always come immediately after waking up. Depending on how busy your
computer is it might take 10 to 20 minutes. It is therefore advised to configure Windows not to enter sleep mode too fast.
Automatic retries with certain failures - Normally the app will execute a scheduled job only once when it is due. This
is also true when during the sync/backup process errors occurs such as: failure writing to a folder, copy errors such as
file is locked, disk is full, etc. The user should then correct such faults and either re-run the task manually or wait till
the next schedule comes up.
With certain type of faults the app will however keep on doing retries every 15 minutes. These faults are: source drive/path
not specified or available, destination drive/path not specified or available, backup operation interrupted, source
access not allowed, destination access not allowed.
3. Execute when inserting a USB storage device that is assigned to the task
The 3rd option for automatic execution allows you to start a sync/copy job when a USB device that is assigned as source or destination device in a task is inserted in the computer. To enable this click on the When the configurable removable drive is being plugged in panel and set the toggle switch to On in the subpanel that pops open.

When enabled SyncFolder will always show a notification in the Windows Notifications Center when it detects that
a configured removable device has been inserted.
If you check Issue a notification message when the device is inserted and allow me to start the task then the app
will not automatically start the task but will present a button in the notification message to start it. When not checked
the task will run immediately.
When you don't eject the USB device while your computer is still on but instead remove the device after the computer is powered off, SyncFolder will ignore the first insertion of the device the next time the computer is restarted. You will then first have to remove the device (eject) and re-insert it.

Last modified: january 27, 2024
